
A bloated WordPress Media Library can quietly consume valuable server storage, increase backup sizes, and make it harder to manage your website’s files. Over time, unused images, duplicate uploads, orphaned files, large originals, and extra image sizes can pile up in your wp-content/uploads directory.
Cleaning these files can free storage, but deleting the wrong media can also break images, downloads, or site functionality. Based on WordPress media management best practices, the safest approach is to back up your site, verify potentially unused files, and test your site after cleanup.
In this guide, we’ll show you how to clean a bloated WordPress Media Library using three safe methods, from the WordPress dashboard to file-level cleanup and media scanning tools.
Why Your WordPress Media Library Becomes Bloated
Before deleting anything, it helps to understand what fills the wp-content/uploads directory and how WordPress handles uploaded media.
WordPress normally stores uploaded media in the wp-content/uploads directory. When you upload an image, WordPress may generate several additional image sizes, such as thumbnail, medium, large, 1536×1536, and 2048×2048, depending on your WordPress version and site configuration. Themes and plugins can also register custom image sizes, so one original image can result in several files on the server.
WordPress does not automatically remove every file in wp-content/uploads when you delete or replace website content. Files can remain when they were uploaded outside the Media Library, left behind by plugins or themes, generated by previous configurations, or are no longer associated with an attachment record.
If you replace an image, delete a page, or uninstall a plugin, many of those media files remain on your server unless you remove them manually.
Common Causes of Media Library Bloat
- Unused media: Images, PDFs, documents, and other files that no longer have an active reference on your website.
- Orphaned files: Files that remain in the wp-content/uploads directory without a corresponding WordPress attachment record. Some may be leftover files, while others may be intentionally created or referenced by plugins, themes, or custom functionality.
- Potentially unused image sizes: Extra image versions generated by themes or plugins that are no longer active and that you’ve confirmed are not referenced by your site.
- Duplicate uploads: The same file uploaded multiple times under different names.
- Large original files: High-resolution photos, screenshots, videos, audio files, and PDFs that consume significant storage space.
Why Cleaning a Bloated WordPress Media Library Matters
A bloated Media Library can lead to:
- Higher disk space usage
- Larger backup files and longer backup times
- Hosting storage warnings or storage-limit issues
- Problems creating staging sites when your hosting account lacks free space
- A cluttered Media Library that’s harder to search and manage
- More files to scan, migrate, or restore during maintenance
If oversized images are still being served on your website, they can also contribute to slower page load times.
However, cleaning your Media Library alone doesn’t guarantee a faster website. It primarily reduces storage usage and backup size. Performance improvements depend on whether those large files were affecting your site’s front-end loading.
Before You Clean Your WordPress Media Library, Do This
Before cleaning your WordPress Media Library, create a complete backup of your WordPress database and website files. If you plan to delete files directly from the server, keep a separate copy of the wp-content/uploads directory so you can restore individual media files if needed.
If you’re using a media cleanup plugin or scanner, test it on a staging site first. These tools are helpful, but they aren’t perfect and can occasionally flag files that are still in use.
WordPress Media Cleanup Checklist
Use this checklist before and after cleaning your WordPress Media Library. It helps you protect your site, track how much storage you recover, and catch broken media before visitors do.
Before cleanup:
- Back up your WordPress database and files. Keep a recent backup you can restore if you accidentally delete media your site still needs.
- Record the current size of wp-content/uploads. This gives you a baseline for measuring how much server storage you recover.
- Identify large, duplicate, or potentially unused files. Review the files before deleting them rather than relying only on filenames or automated scan results.
- Test your cleanup process on a staging site when possible. This gives you a safer place to verify deletions before making changes to your live website.
After cleanup:
- Check important pages for broken images. Pay special attention to pages with featured images, galleries, or image-heavy sections.
- Test galleries, featured images, and downloadable files. Confirm that important media still loads and downloads correctly.
- Check WooCommerce products if your site uses WooCommerce. Product images and downloadable files may rely on media files outside standard post content.
- Recheck the wp-content/uploads directory size. Compare it with your original measurement to see how much storage you recovered.
- Create a fresh backup and compare its size with the previous backup. This helps you measure the practical impact of your cleanup and gives you a new recovery point.
How to Backup Your WordPress Media Library?
You have several options for backing up your WordPress Media Library. Choose the approach that matches the size of your cleanup and the level of recovery you need.
- Manual Backup via Host: Many web hosts offer backup tools through their hosting control panel. Create a full backup that includes your WordPress files and database before you begin. A full backup gives you a recovery point if you accidentally delete media that your site still needs.
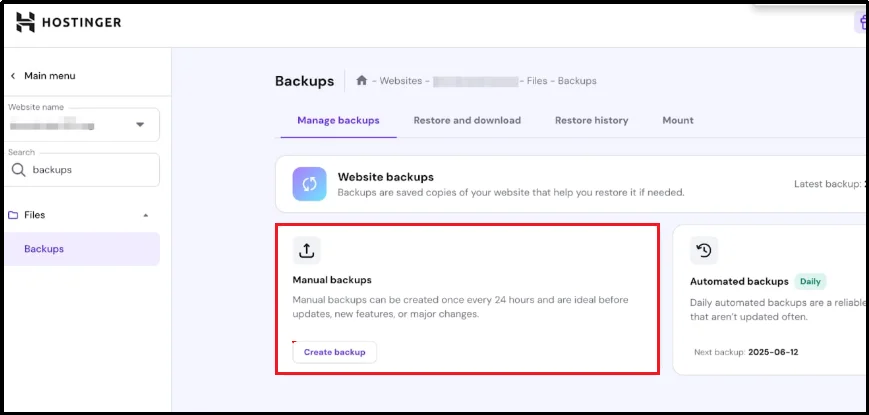
If your site uses Hostinger, follow its current backup documentation to create a full website backup before cleaning your Media Library.
- Local Backup via Plugin: If you want a separate copy of your media files, download the wp-content/uploads directory from your server using Advanced File Manager.
Navigate to:
public_html → wp-content → uploads
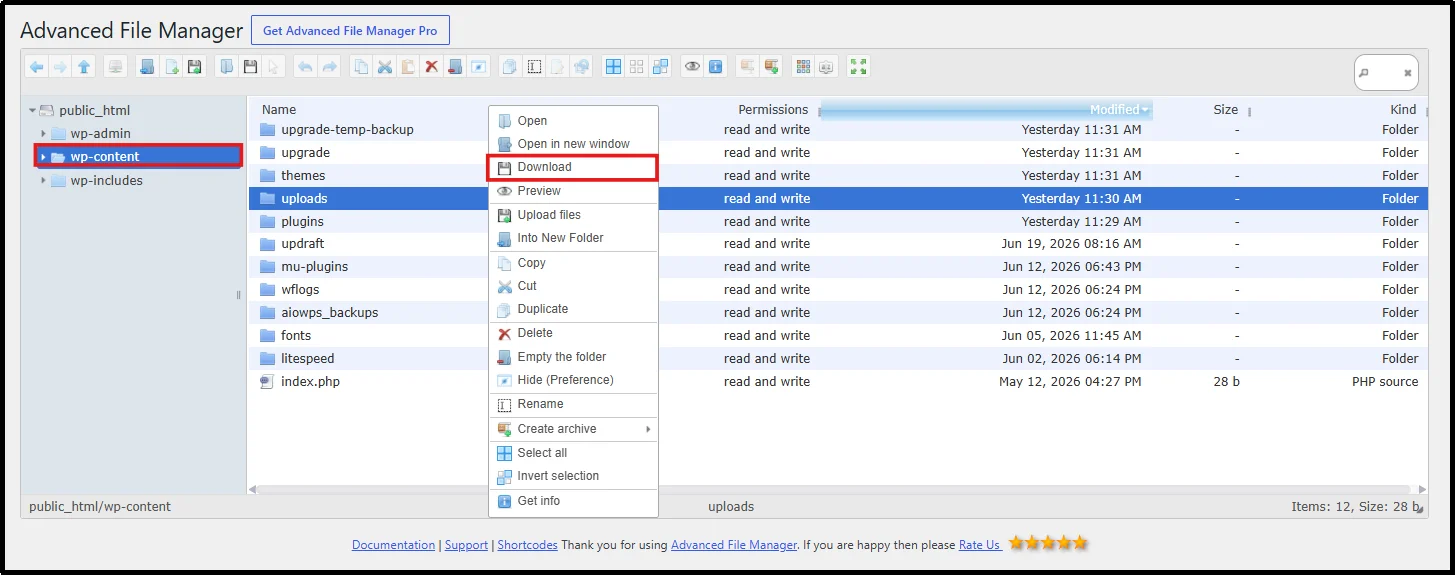
Download the entire uploads folder to your computer. This folder contains all media files uploaded to your WordPress site.
- Local Backup via WordPress Media Library: If you only need to preserve a few important files, you can download them individually from the WordPress dashboard.
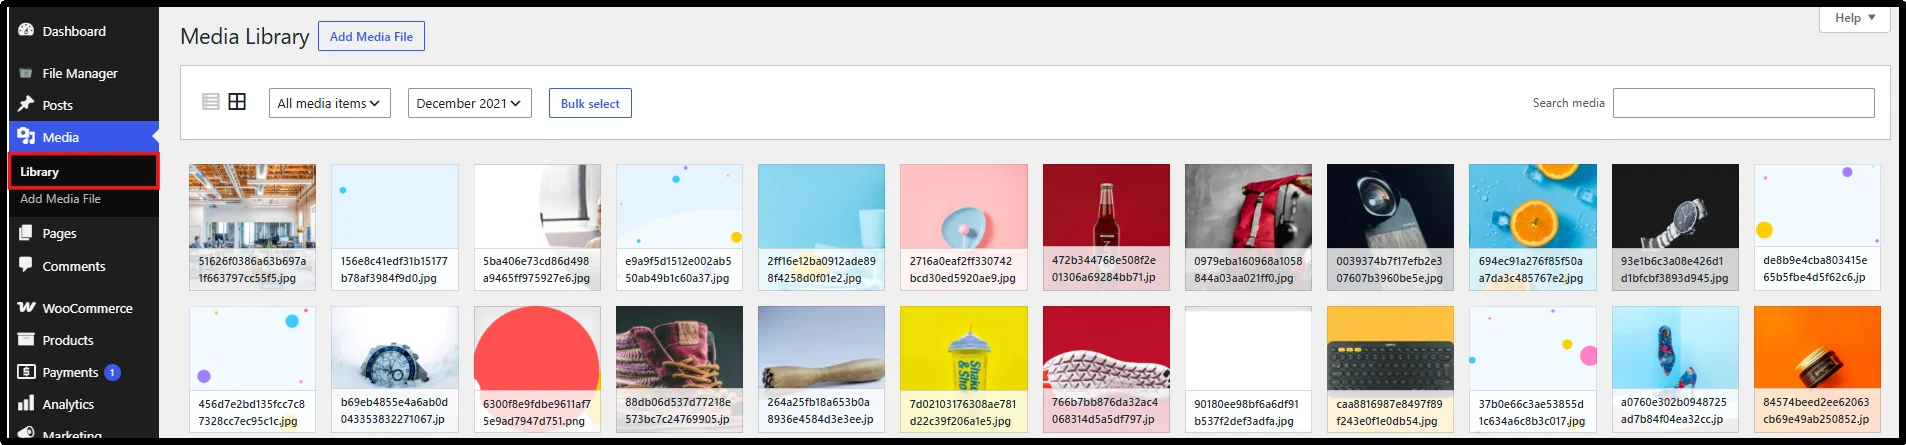
Go to Media → Library, open the media file you want to keep, and download it to your computer. This method works well when you only need a handful of files, but it isn’t practical for backing up an entire Media Library.
Recommendation: If you’re planning a large-scale media cleanup, keep both a full website backup and a copy of the uploads folder. This gives you the easiest recovery options if you accidentally delete a file that’s still in use. The uploads folder preserves the physical media files, while the database preserves WordPress’s attachment records and metadata. Keeping both gives you a more complete recovery option.
What Media Files Can You Delete?
Not every file that looks unused is safe to delete. Before removing anything from your WordPress Media Library or wp-content/uploads directory, check whether your site still references it. Use the following guidelines to determine which files may be safe to remove from media that could still support your site’s content or functionality.
Potentially safe to delete:
- Files you’ve confirmed your site no longer references
- Orphaned files you’ve reviewed and confirmed your site no longer needs
- Image sizes generated by themes or plugins you no longer use
- Duplicate media files that you’ve confirmed no active content references
Don’t delete without checking:
- Featured images currently used by posts or pages
- Images embedded in published content
- Files referenced by widgets, menus, or theme templates
- Media used by page builders such as Elementor or Divi
- Files referenced through custom fields, WooCommerce data, APIs, or custom code
Important note: No media cleanup tool can detect every possible file reference. Themes, plugins, page builders, custom fields, and custom code may reference media outside WordPress’s standard attachment relationships. Always review flagged files before deleting them, and use your backup to restore anything you remove accidentally.
3 Safe Methods to Clean a Bloated WordPress Media Library
The right cleanup method depends on the size of your Media Library, how much control you need, and whether you want to review files manually or automatically scan for potentially unused media.
Below are three reliable methods to clean your WordPress Media Library safely. Whichever method you choose, review files carefully before deleting them to avoid removing media that’s still in use.
Method 1: Clean Up from the WordPress Dashboard
Manual cleanup takes the most time, but it gives you direct control over which media files you remove.
- Log in to your WordPress admin.
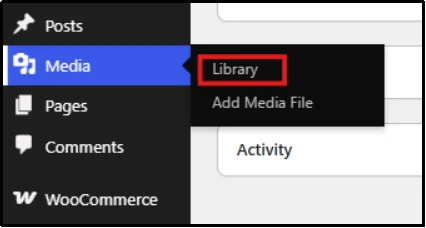
- Go to Media, then Library.
You can switch between grid and list view depending on what’s easier to scan.
Although the Unattached filter helps identify files that aren’t attached to posts or pages, it isn’t a reliable indicator of unused media. Some themes, builders, and plugins use images without attaching them to posts.
Although the Unattached filter can identify files that WordPress has not attached to a post or page, it does not prove that those files are unused. Themes, plugins, page builders, custom fields, and other site components can reference media independently of that relationship.
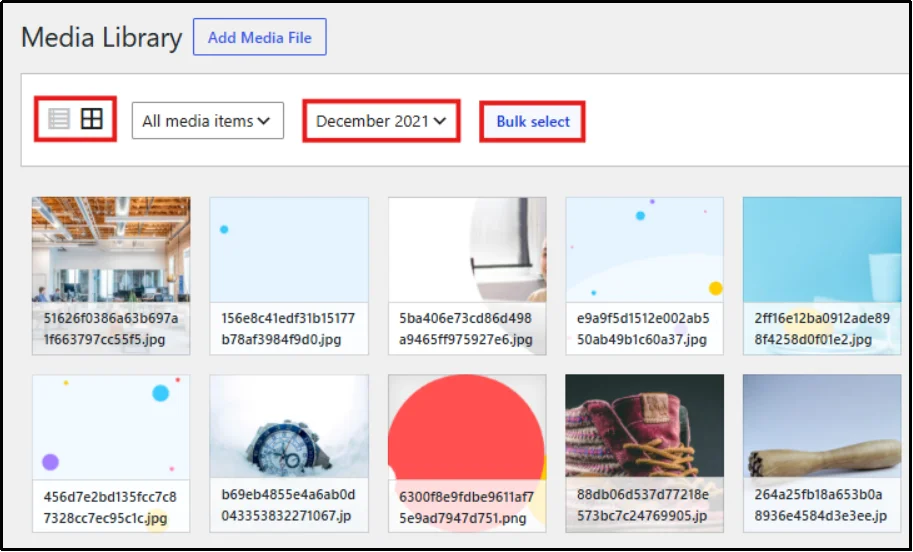
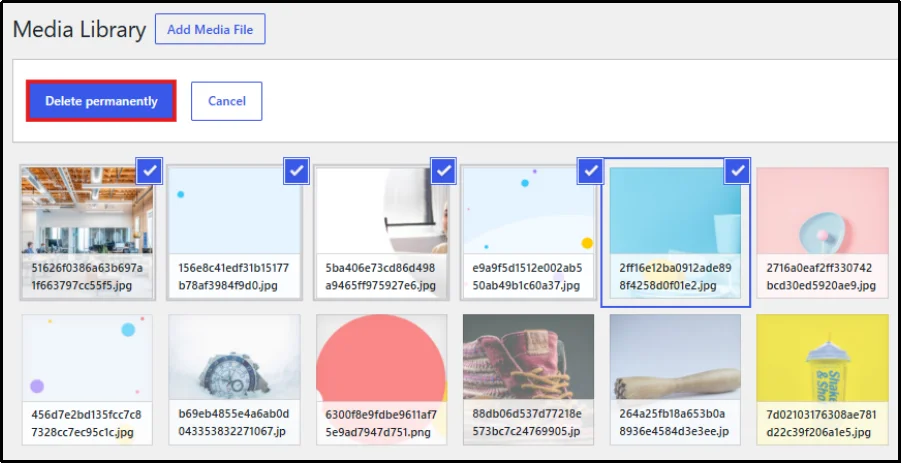
- To remove several at once, switch to Bulk Select, check the files you want gone, and choose Delete Selected. For a single file, open its details and choose Delete Permanently.
This screen has real limits, though. It doesn’t show file sizes, doesn’t group files by folder, and has no way to see orphaned files that exist on disk without a database record. Once your library grows beyond a few hundred files, or you actually need to see what’s eating up your disk space, it’s time to move to file-level tools.
Method 2: Clean the WordPress Uploads Folder With a File Manager Plugin
Many WordPress users don’t feel comfortable using FTP or their hosting provider’s file manager. Advanced File Manager solves this by giving you direct access to the wp-content/uploads folder from your WordPress dashboard.
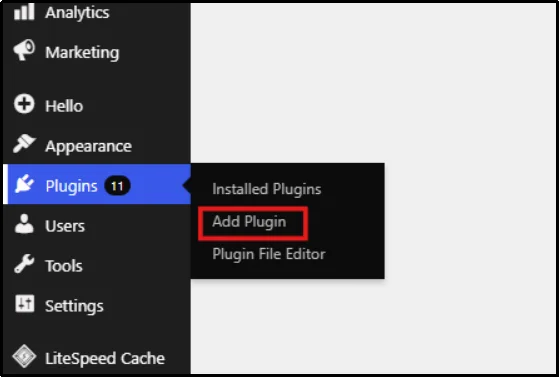
- In your WordPress dashboard, go to Plugins → Add Plugin.
- Search for Advanced File Manager.
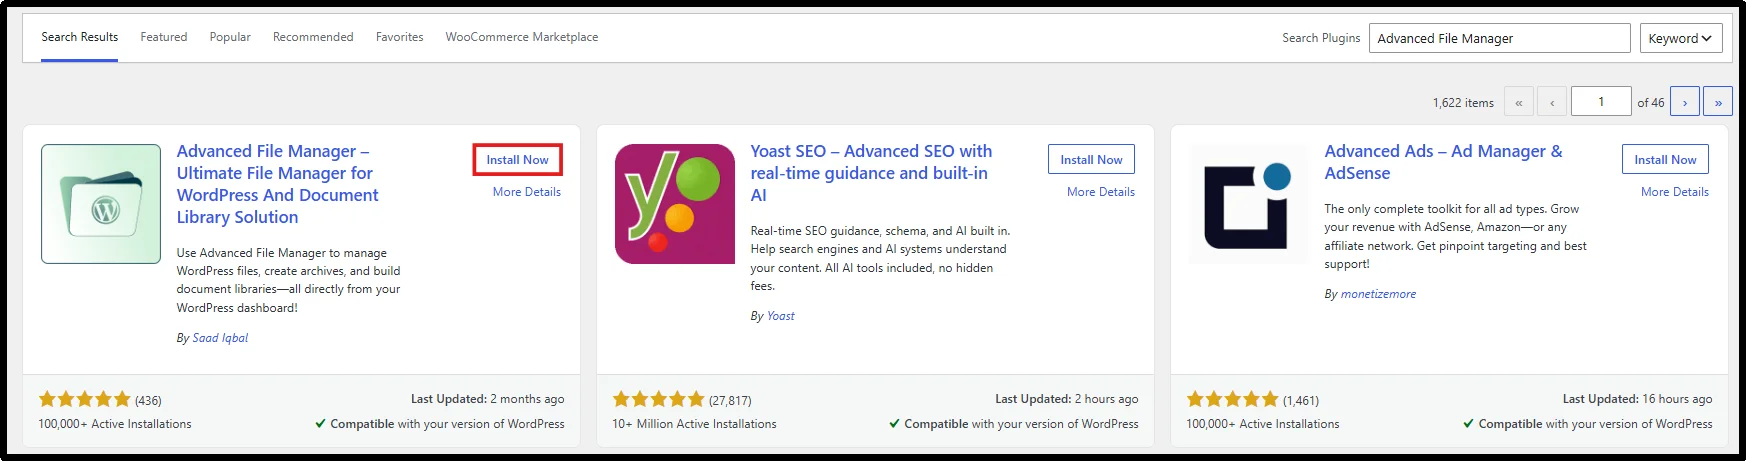
- Click Install Now, then click Activate after WordPress finishes installing the plugin.
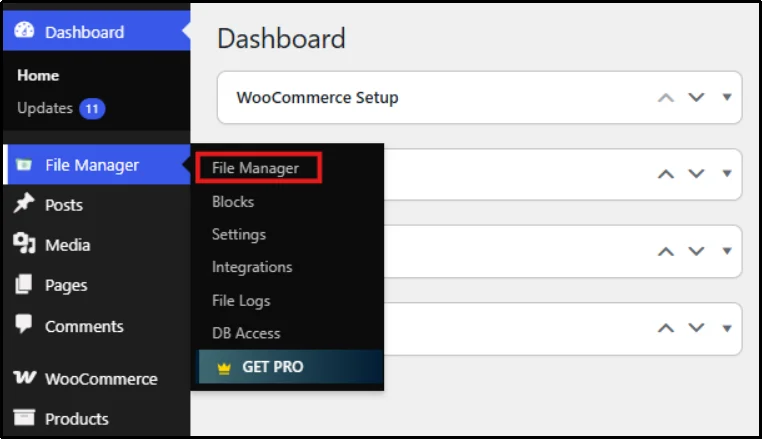
- Open File Manager from your WordPress dashboard.
- In File Manager, navigate to your WordPress installation’s wp-content/uploads directory. On many hosting accounts, this appears under a path such as public_html/wp-content/uploads, but the exact document root can vary by host.
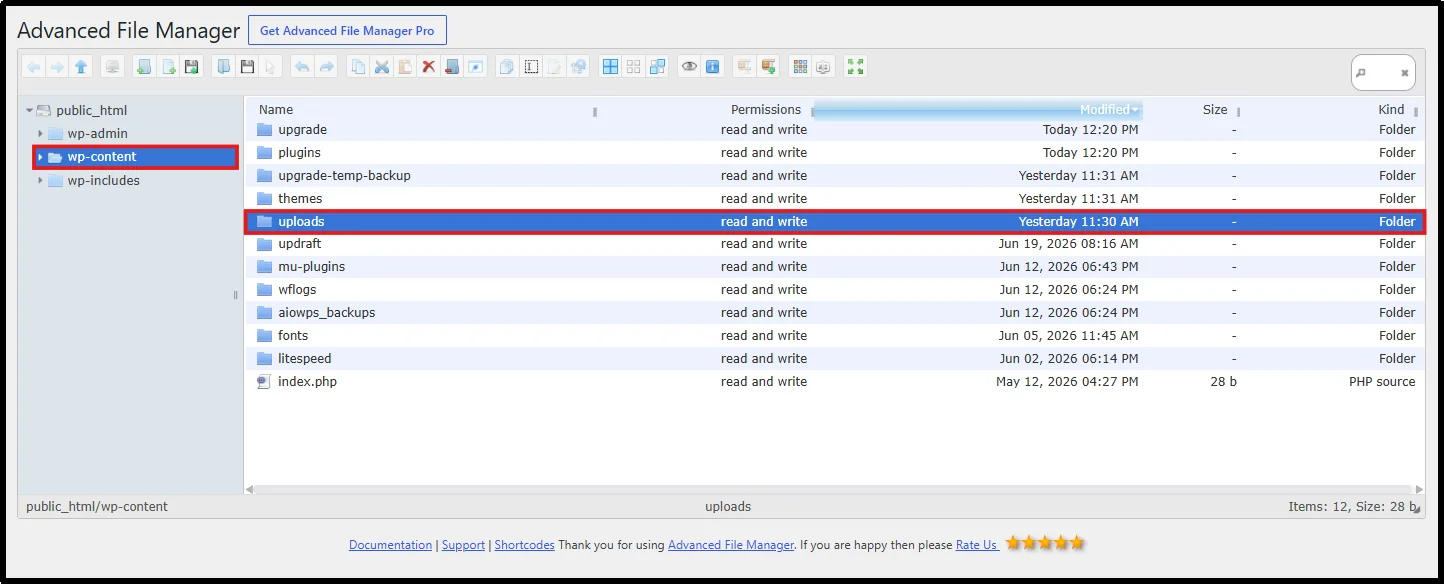
Check the folder size before you start. Advanced File Manager displays folder sizes, making it easy to measure how much storage your Media Library uses. Before deleting anything, note the current size of the wp-content/uploads folder.
After deleting files you’ve verified as unnecessary, check the directory size again to see how much server storage you recovered. Comparing the before-and-after sizes also helps confirm that your cleanup made a meaningful difference.
- Open the uploads folder to view all your media files and subfolders (usually organized by year and month).
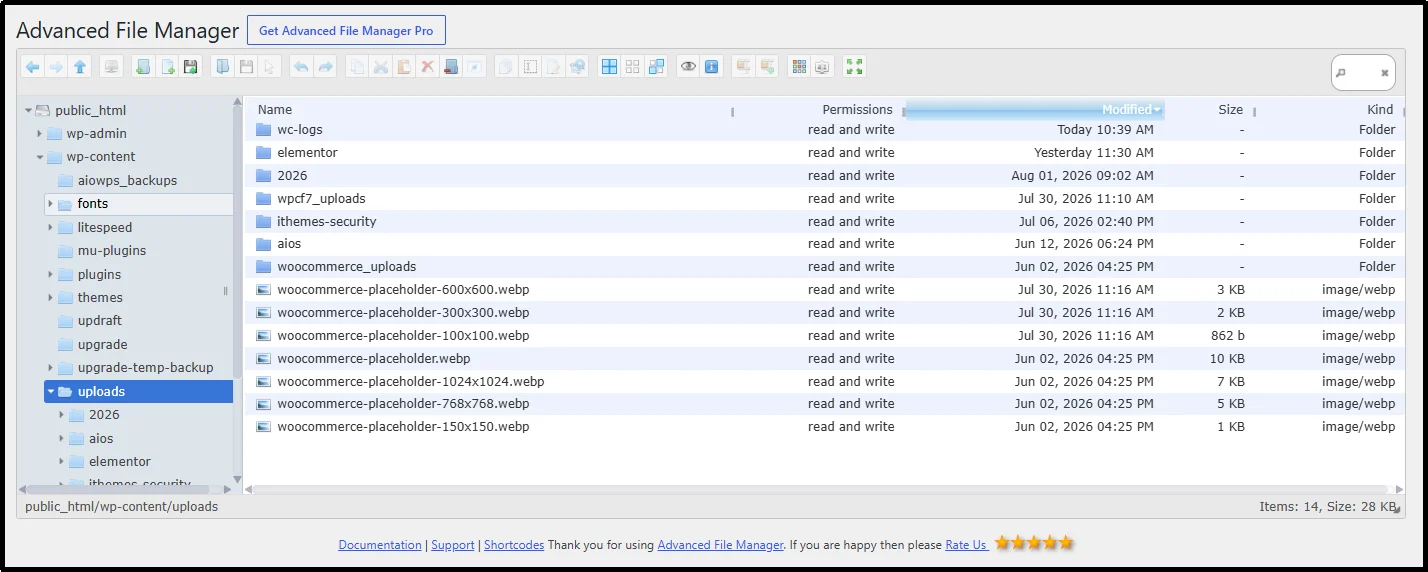
- Review the folders carefully and identify media files you no longer need, such as duplicate uploads, outdated images, or files you’ve already verified as unused.
- Select only the files or folders you want to remove. Right-click the selected files and choose Delete.
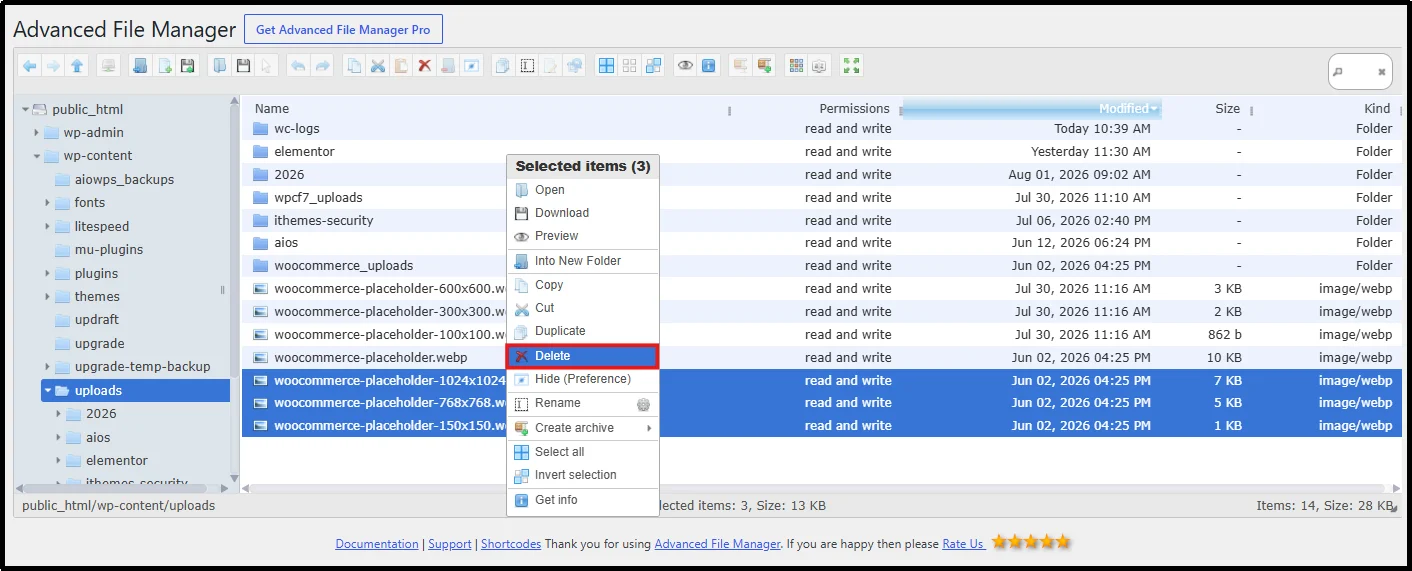
- Confirm the deletion when prompted.
Note: Avoid deleting the entire uploads folder unless you intentionally want to remove every media file from your WordPress site.
Method 3: Find Potentially Unused Media With a Scanner Plugin
For large Media Libraries, manually reviewing every file can take a significant amount of time. A media cleanup or scanner plugin can help identify files that may no longer have active references.
- In your WordPress dashboard, go to Plugins → Add Plugin.
- Search for Media Cleaner. Click Install Now, then Activate the plugin.
- Navigate to Media → Cleaner.
- Click Scan to analyze your Media Library.
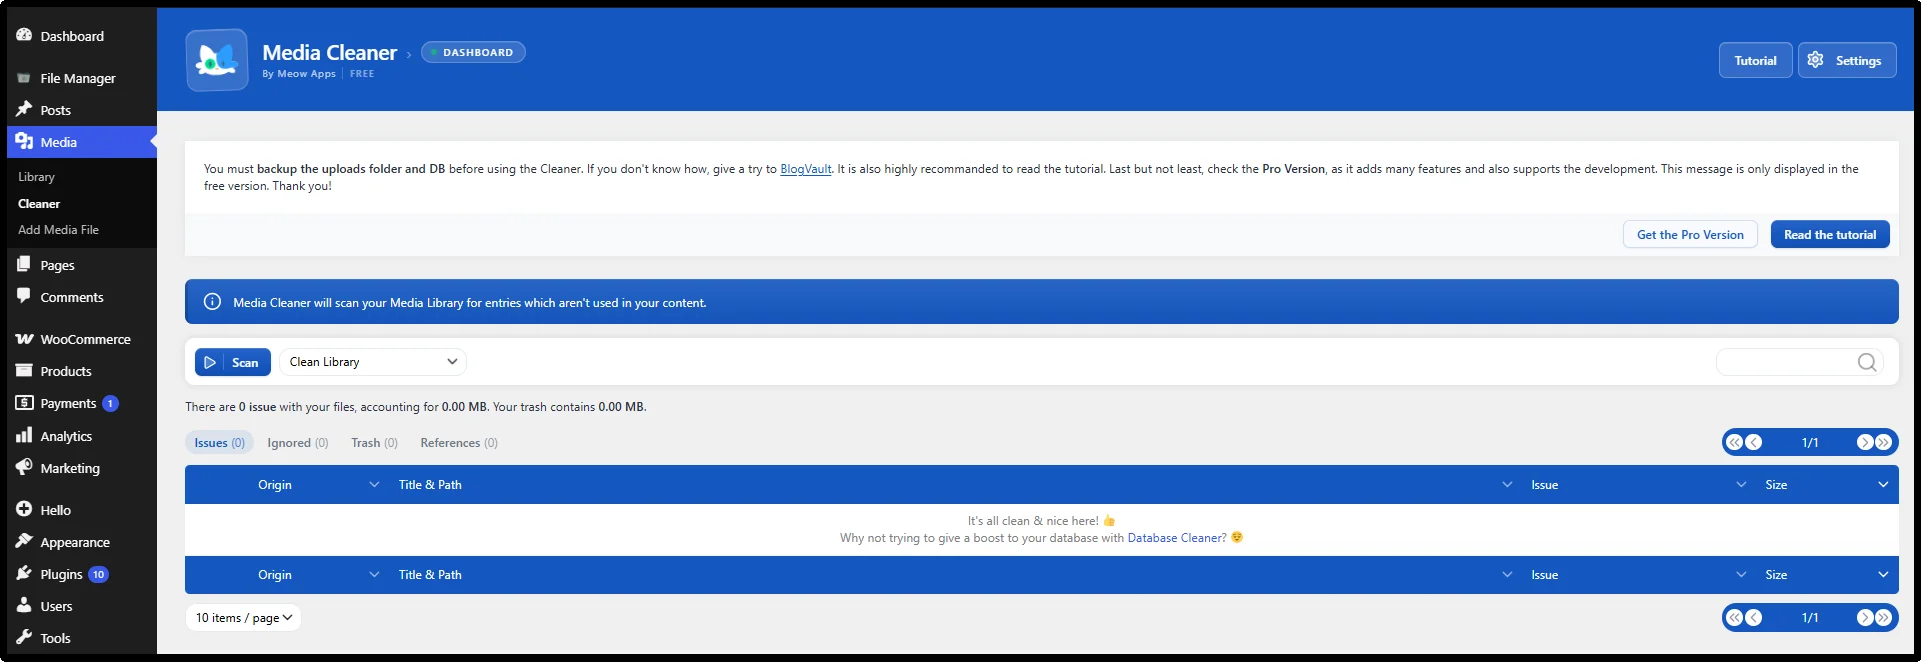
- Review the list of files flagged as unused.
- Carefully verify each file before deleting it, then remove only the files you’ve confirmed are no longer needed.
Important: Scanner plugins can occasionally flag files that page builders, custom fields, or themes still use. Always review the results and keep a recent backup before deleting any media.
Verify Your WordPress Media Library Cleanup
This step gets skipped in most cleanup guides, and it shouldn’t be.
Open several important pages after the cleanup, especially pages with featured images, galleries, WooCommerce products, downloadable files, or page-builder sections. Look for broken images, missing downloads, or other content that no longer loads correctly.
If you find missing media, restore the affected files from your backup before making further changes. Also check your database and site configuration to see whether the deleted media supported dynamic content, custom fields, or plugin-generated data.
Check your uploads folder size again, either through your hosting panel or with Advanced File Manager’s directory size calculation, to confirm the space actually dropped. Then run or estimate a fresh backup and compare its size and completion time to what you had before. Writing down the before-and-after numbers gives you a concrete way to see the result of the work you just did.
What a WordPress Media Cleanup Tool Can and Can’t Detect
Media cleanup tools can compare files against WordPress content and database records, but no automated scanner can reliably understand every possible reference on every WordPress site. Themes, plugins, page builders, custom fields, JavaScript, CSS, external integrations, and custom code can reference media in ways a scanner may not detect.
Treat scan results as a list of files to investigate, not as a list of files that you can automatically delete. Review important files manually, keep a recent backup, and test your site after cleanup.
How to Keep Your WordPress Media Library Clean
Cleaning up a bloated WordPress media library might solve the issue for some time, but it’s equally important to perform a routine check. A few habits, applied consistently, go a long way toward keeping your media library manageable long term.
- Create a Regular Cleanup Schedule: A light monthly review can work well for sites that are actively updated. Look for obvious duplicates, oversized uploads, and files you know you no longer need before they accumulate. Plan a deeper cleanup every three to six months for busy blogs or stores that upload frequently.
- Choose an appropriate image format before uploading. Use JPEG or WebP for many photographs, PNG when you need transparency or lossless quality, and GIF mainly for simple animations. For modern WordPress sites, consider WebP or AVIF when your hosting stack and image workflow support them.
- Resize large images before uploading when you know their maximum display dimensions. Compress them to reduce file size while keeping enough visual quality for your site. Avoid uploading camera-original images when the website only needs a much smaller version.
- Use descriptive filenames that reflect the image content, and add useful alt text when the image serves a meaningful purpose. Descriptive filenames can make your Media Library easier to manage, while accurate alt text helps users who rely on screen readers and gives search engines useful context about the image.
- Consider hosting large videos on a dedicated video platform or another storage service instead of serving them directly from your WordPress hosting account. For large audio or downloadable files, evaluate whether your hosting plan can handle the storage and bandwidth requirements before keeping them in wp-content/uploads.
- Replace files instead of re-uploading them. When an image needs an update, replace the existing file rather than uploading a new one and deleting the old one. This avoids generating a whole new set of image sizes for content that’s functionally the same.
Have You Cleaned Your Bloated WordPress Media Library?
A bloated WordPress Media Library usually comes from a mix of unused media, orphaned files, duplicate uploads, oversized originals, and extra image sizes. Back up your site before deleting anything, choose a cleanup method that fits your library, verify your important pages afterward, and schedule regular reviews to keep unnecessary files from building up again.
If you want to browse and clean wp-content/uploads directly from your WordPress dashboard without FTP, Advanced File Manager is free to install from WordPress.org.
For sites that want to move heavy files off-server entirely, Advanced File Manager Pro adds integrations with Amazon S3, Google Drive, Dropbox, OneDrive, pCloud, and Cloudflare R2, along with role-based access control, file logs, and email and Slack notifications for teams managing files together.
Download Advanced File Manager to browse your WordPress files from the dashboard, manage the wp-content/uploads directory, and clean up unnecessary files without relying on FTP.
Frequently Asked Questions
How do I clean my WordPress media library?
Back up your site first, then use the built-in Media screen for smaller libraries, Advanced File Manager, or a scanner plugin for automated detection across large libraries. Review every file before deleting it, and verify your site afterward.
Is it safe to delete unused media files in WordPress?
It’s safe to delete media files after you’ve confirmed that your site no longer references them. Back up your site first, review files used by page builders and custom fields, and test the affected content after deletion.
Can deleting unused images break my website?
Yes. Images referenced by page builders, custom fields, WooCommerce products, or custom code may not appear as attached media. Always verify before deleting.
Does WordPress automatically delete unused media?
WordPress does not automatically remove every uploaded media file simply because you delete or replace content. You may need to remove unnecessary files manually or use a media cleanup tool after verifying that the files no longer serve a purpose.
What’s the difference between unattached and unused media?
An unattached media item has no attachment relationship with a post or page in WordPress, but the file may still appear elsewhere on your site. Truly unused media has no active references from your site’s content, theme, plugins, custom fields, page builders, or custom code.
How often should I clean my WordPress media library?
A light monthly check works well for active sites. Plan a deeper cleanup every three to six months if you upload frequently, and once a year is usually enough for small, rarely-updated sites.
What causes a bloated WordPress media library?
Auto-generated image sizes, custom sizes added by themes and plugins, files left behind by unused or removed content, oversized original uploads, and video or audio files hosted directly in the library.
How do I find unused images in WordPress?
Start with the Unattached filter in the WordPress Media Library, but don’t treat it as proof that a file is unused. For larger sites, use a reputable media scanner to identify potential unused files, then review the results before deleting anything. You can also inspect the wp-content/uploads directory with a file manager when you need to investigate orphaned files or server-level storage usage.
What is an orphaned media file?
An orphaned media file is a file that still exists in the wp-content/uploads directory but no longer has the expected WordPress database attachment record. It can remain after manual uploads, incomplete cleanup, plugin changes, or other processes that leave files on the server. These typically come from failed deletions, removed plugins, or files added outside of WordPress.
Can I clean the WordPress media library without a plugin?
Yes. You can manually remove media through the WordPress Media Library, and you can use a dashboard file manager when you need to inspect the wp-content/uploads directory directly. A scanner plugin can help identify potential unused files when your library becomes too large to review manually.
Does cleaning the media library speed up my site?
Cleaning your Media Library can reduce server storage usage and backup size, but it does not automatically make your pages load faster. Page-speed improvements usually come from optimizing images that visitors actually download, such as resizing oversized images, compressing them, and serving efficient formats.