If you’ve ever wondered where all your WordPress uploads—images, PDFs, audio, or videos—end up, the answer is ‘wp-content/uploads’ folder.
But here’s the catch: this folder is a vital part of your WordPress site’s architecture. If it goes missing, your site could break. If it’s poorly managed, it could slow things down. And if it’s not properly secured, hackers might see it as an open door.
Don’t worry! In this guide, we’ll walk you through everything you need to know about the wp-content/uploads folder. What it is, how it’s structured, how to properly upload files to it, how to access it using different methods, and most importantly, how to protect it.
Ready? Let’s get started!
What Is the WP-Content Folder in WordPress?
The wp-content folder is one of the most important parts of your WordPress installation. Themes, plugins, and all the media you upload are stored right here.
While WordPress core files handle how the site runs, the WP-content folder handles what it looks like and how it behaves.
Here’s a quick breakdown of what’s inside this directory:
- Themes: All active and inactive themes on your site are stored here. This includes all your design layouts, templates, and style tweaks.
- Plugins: WordPress plugins are stored in their folder inside the wp-content folder.
- Uploads: This is the one we’re focusing on today. Every time you upload a file, whether it’s a JPEG, MP4, or PDF, it’s stored in wp-content/uploads.
The uploads folder is especially important because it holds all your website’s media assets. Without it, your blog posts, product images, and downloadable files would simply disappear from your site. That’s why it’s always included in any proper site backup or migration.
Inside the Uploads Folder: How It’s Structured
Once you start uploading media to WordPress, the platform quietly organizes everything inside the wp-content/uploads folder.
By default, WordPress stores media files in folders based on the year and month they were uploaded. So, if you upload an image in July 2025, it’ll land in:
/wp-content/uploads/2025/07/
This structure helps keep your files organized and prevents them from piling up in a single, messy folder. It’s easier to sort, manage, and troubleshoot when things are arranged chronologically.
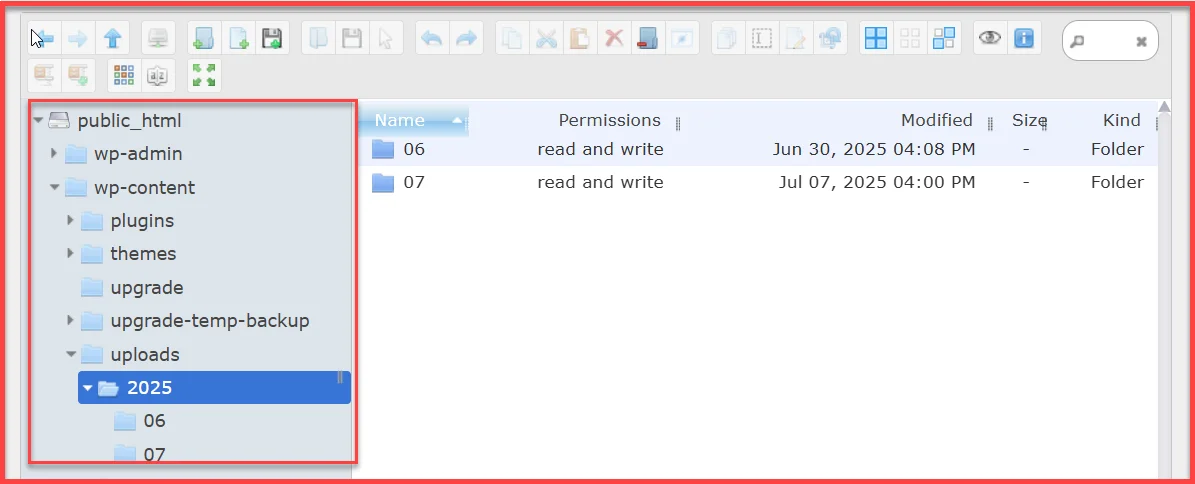
Here’s what you’ll typically find inside:
- Year/Month Folders: These are automatically created by WordPress. For example, 2024/12, 2025/01, and so on.
- Media Files: These can include images (JPG, PNG, GIF), videos (MP4), audio (MP3), PDFs, Word documents, ZIP files, and anything else you upload through the Media Library or plugin interfaces.
- Plugin Media Folders: Some plugins (like page builders, gallery tools, or backup plugins) create their own folders inside uploads. These might store cache files, thumbnails, or other dynamic content.
- Custom Subdirectories: Advanced users or developers may manually create additional folders for better organization or to store files for specific plugins or features.
This kind of automatic file arrangement makes things simple behind the scenes. You don’t have to worry about sorting files manually—WordPress handles it for you.
How to Access the WP-Content Uploads Folder
Whether you want to back up your media files, troubleshoot a missing image, or upload something manually, there are multiple ways to access the wp-content/uploads folder. But not all methods are created equal.
Some are safer and easier, especially for beginners. Others are more technical and best reserved for advanced users.
Let’s break down the best access methods in order of usability and control.
Method #1: Use a WordPress File Manager Plugin [Best Option]
If you’re not comfortable navigating hosting control panels or FTP software, using a WordPress file manager plugin is the safest and most user-friendly way to access your files.
For this guide, we will use the Advanced File Manager plugin, which is used by over 200,000 users to manage WordPress files daily.
To access the WP-Content folder using Advanced File Manager, follow the steps below:
- Install and activate Advanced File Manager from the WordPress plugin repository.
- From your WordPress dashboard, go to ‘File Manager.’

- A file browser will open right inside your dashboard.
- Navigate to public_html > wp-content > uploads.
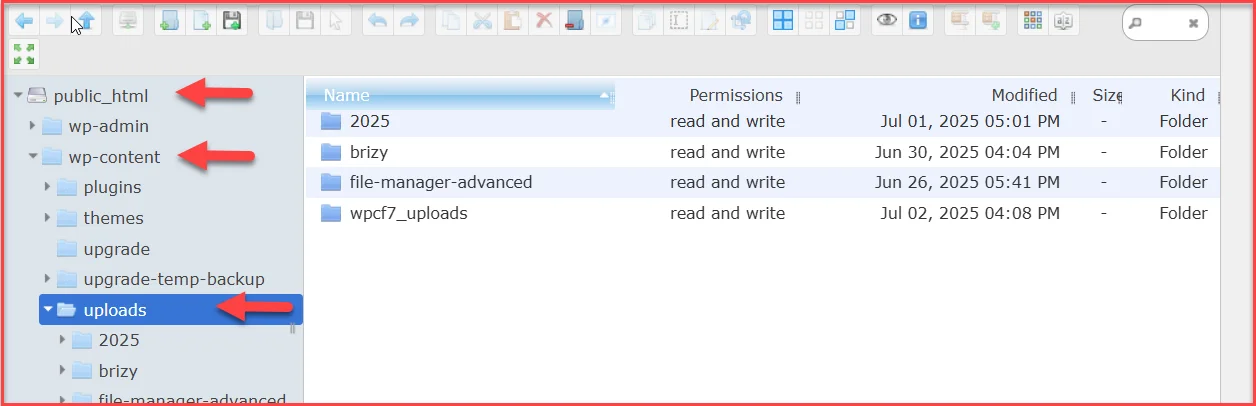
You now have full access to your uploads folder. You can view, move, rename, or delete files without leaving your WordPress admin area.
Method #2: Via cPanel (Hosting Control Panel)
This method gives you direct access to your server files without needing to install a plugin. Here’s how you can do it:
- Log in to your hosting account (e.g., Hostinger, Bluehost, SiteGround).
- Go to cPanel and find the File Manager.
- Open the root directory—usually labeled public_html.
- Inside, open the ‘wp-content’ folder, then the ‘uploads’ folder.
From here, you can upload, download, and edit files. But be cautious, accidentally deleting or modifying the wrong file can cause serious issues on your site.
Method #3: Using an FTP Client [Not Recommended for Beginners]
If you’ve worked with servers before or want more control, an FTP client like FileZilla can help.
- Download and install FileZilla (or your preferred FTP client).
- Get your FTP login credentials from your hosting provider.
- Connect to your website.
- In the right panel, go to public_html > wp-content > uploads.
You can now browse the uploads folder, upload large files, or make advanced changes.
⚠️ Caution: FTP gives you full access to your server. It’s powerful, but one wrong move could mess up your site’s structure. Only use this method if you’re confident in what you’re doing.
How to Upload Files to the WP-Content Uploads Folder
Now that you know how to access the wp-content/uploads folder, let’s talk about how to add files to it the right way. Depending on what you’re trying to do—upload a single image, bulk-import PDFs, or restore files after a migration—you have a few solid options.
We’ll start with the most straightforward method and work our way down to the more advanced ones.
Method #1: Using the WordPress Admin Panel (Media Library)
This is the go-to method for most WordPress users. It’s easy, quick, and works right inside your dashboard.
- Log in to your WordPress admin panel.
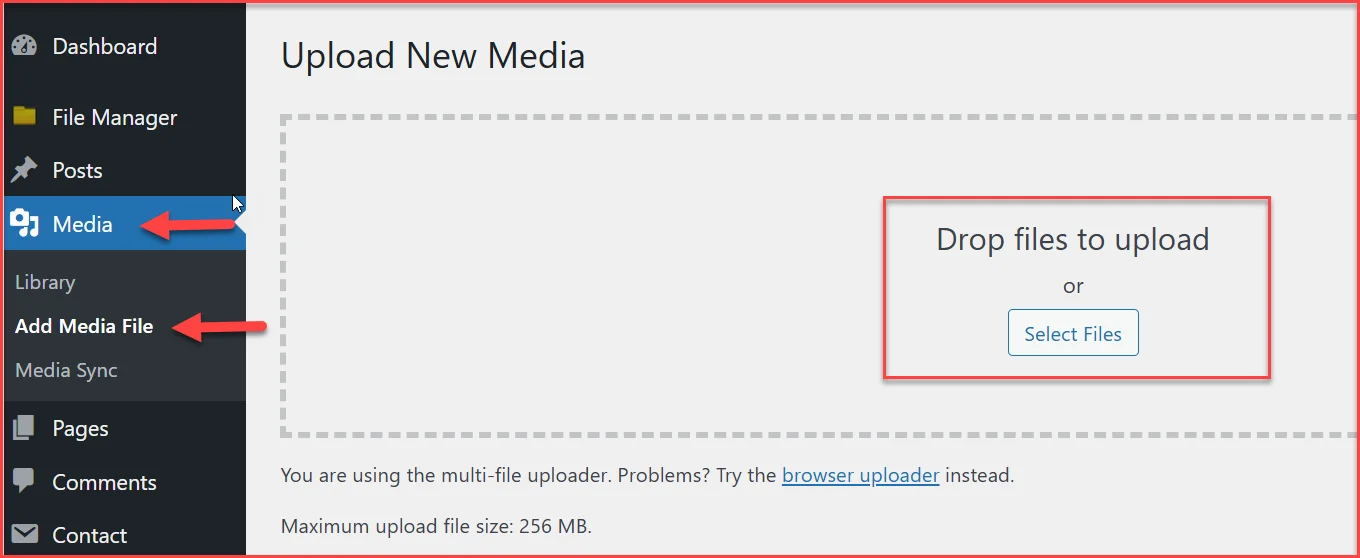
- Go to Media > Add Media File.
- Click ‘Select Files’ or drag and drop your files directly into the window.
- WordPress will automatically upload and sort them into the corresponding year and month folders.
🚨 Heads up: Your hosting provider usually sets an upload size limit—often 2MB, 10MB, or 64MB.
If you need to upload larger files, you can increase the limit by adding this to your wp-config.php file:
@ini_set( ‘upload_max_size’ , ’64M’ );
@ini_set( ‘post_max_size’, ’64M’);
@ini_set( ‘max_execution_time’, ‘300’ );
Method #2: Use a WordPress File Manager Plugin
If you need more control or want to upload directly to a specific folder within /uploads, a plugin like Advanced File Manager comes in handy.
- Navigate to WP File Manager from your dashboard.
- Go to public_html > wp-content > uploads.
- Use the file manager context menu or toolbar to upload new files or create custom folders.
For this guide, we have uploaded the ‘Post.jpg’ file, which you can see in the screenshot below.
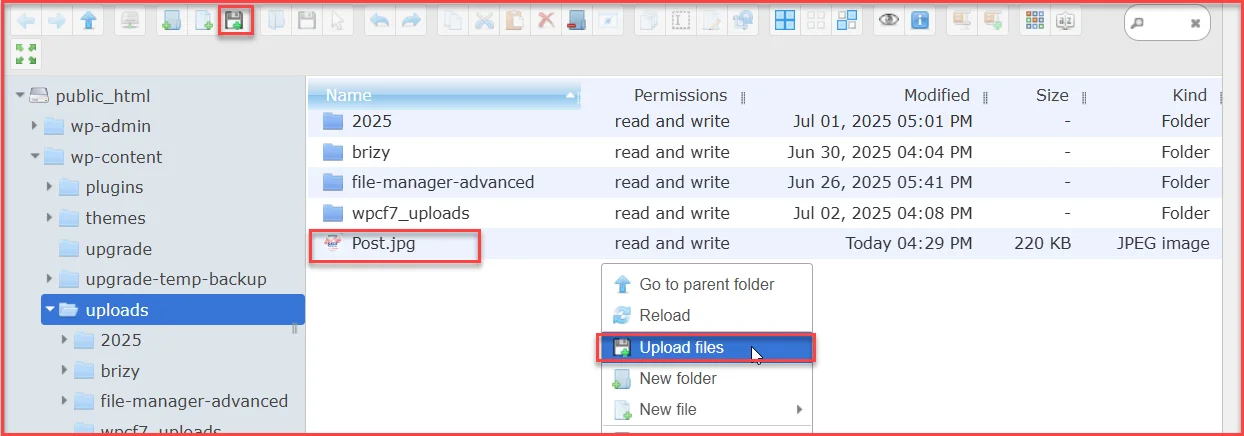
This method is especially useful for bulk uploads or working with non-media files that you don’t need to show up in the Media Library.
👉 To learn more about file management using Advance File Manager plugin, check out our guide on How to Upload and Manage Files Using File Manager in WordPress [No FTP Required]
Method #3: Using an FTP Client
For uploading large batches of files or restoring site content, FTP gives you full control.
- Open your FTP client (e.g., FileZilla).
- Connect to your server using your FTP credentials.
- On the left panel, navigate to the files on your local computer.
- On the right panel, go to public_html/wp-content/uploads.
- Drag and drop files or folders from your local machine to the server panel.
⚠️ Important Note:
If you upload media files using a plugin or FTP instead of the WordPress dashboard, WordPress doesn’t automatically appear in the Media Library.
But there’s an easy fix.
Sync Manually Uploaded Files Using Media Sync Plugin
When you upload files outside of WordPress (via FTP or a file manager plugin), those files are physically stored, but they’re not yet registered in the WordPress database. That’s why they won’t appear in the Media Library.
To fix this, follow the steps below:
- Install and activate the Media Sync plugin.
- After installing, go to Media > Media Sync in your dashboard.
- Click the ‘Scan Files’ option. The plugin will scan the /wp-content/uploads/ folder for unregistered files.
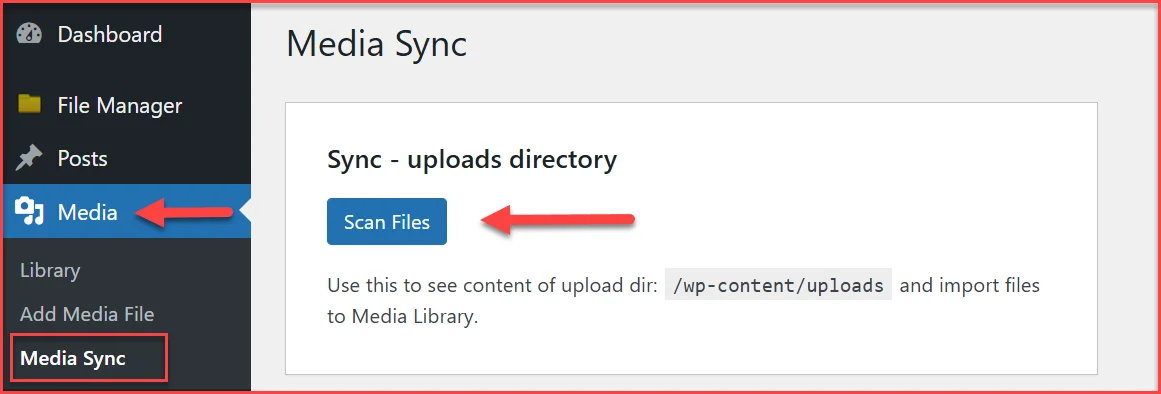
- On the subsequent screen, uncheck the ‘Dry Run’ option.
- Next, select the items you want to import and click ‘Import Selected’.
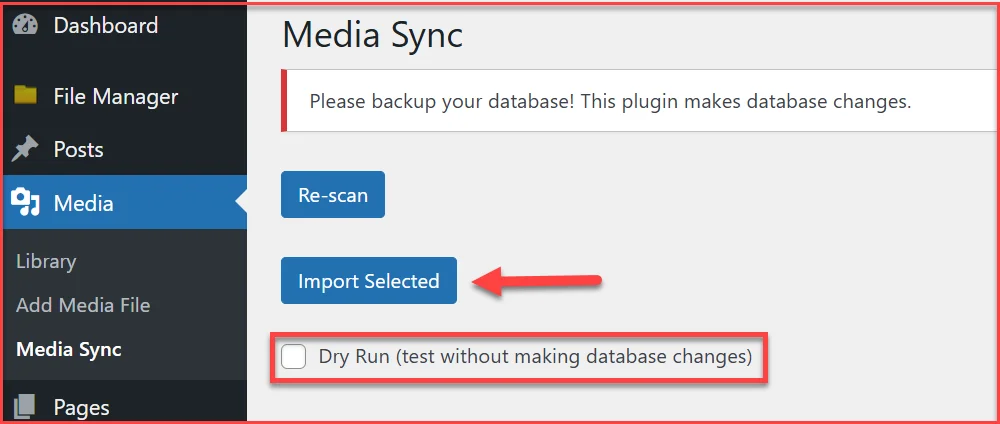
This tells WordPress, “Hey, these files exist. Add them to the Media Library.”
As you can see, the ‘Post.jpg’ file is in the media library.
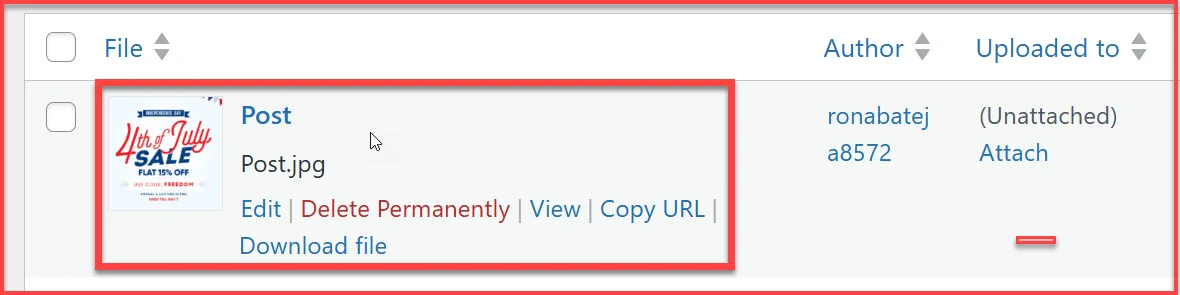
And just like that, your manually uploaded files become fully usable in your posts, pages, and galleries.
How to Secure the WP-Content Uploads Folder
The wp-content/uploads folder is more than just a media library; it’s a known entry point for hackers looking to exploit vulnerabilities in your site. Because this folder accepts uploads from various sources (including users and plugins), it can become a target for malicious files.
That’s why locking it down is critical.
Let’s walk through the smartest ways to protect this folder, without breaking your site or blocking your media from loading.
Why It’s a Target for Hackers
When attackers try to break into WordPress sites, they often look for places where they can upload malicious scripts, typically disguised as harmless files. The uploads folder is a perfect hiding spot because it’s writable and publicly accessible.
Once inside, a malicious PHP file can:
- Create a backdoor for remote access
- Inject code to redirect visitors
- Leak sensitive information
- Deface your website
So, what can you do about it?
Here are four easy ways to secure the WP-Content Uploads folder.
#1: Disable PHP Execution in the Uploads Folder (Manual Method)
The most effective way to block harmful scripts is to stop PHP from running in the uploads folder.
Here’s how to do it manually:
- Access your website via FTP or cPanel, or the File Manager plugin. (If WordPress admin access is unavailable, refer to these 15 common issues and solutions to restore connectivity before proceeding.)
- Navigate to: public_html/wp-content/uploads/
- Create a new file named .htaccess.txt if it doesn’t already exist.
- Open the file and paste the following code:
<Files *.php>
deny from all
</Files>
- Save the file.
🔐 What this does: Even if a PHP file somehow lands in this folder, the server won’t execute it, which ultimately neutralizes most upload-based threats.
#2: Hide Folder Paths Using a WordPress Security Plugin
You can also use a security plugin to obscure your site’s directory structure from bots and nosy visitors. While this doesn’t lock everything down, it adds a valuable layer of protection that blocks common entry points and discourages attacks.
We recommend using WP Hide & Security Enhancer or Prevent Files / Folders Access (by miniOrange) for this.
Here’s how to do it with WP Hide & Security Enhancer:
- Install and activate WP Hide & Security Enhancer.
- In your dashboard, go to WP Hide → ‘HIDE → Rewrite/URLs’ → Uploads.
- Enable Block upload URL and optionally, set a custom uploads path.
- Go to WP Hide → ‘HIDE → General / Html’ and enable Disable Directory Listing.
- Save changes.
This prevents visitors (or bots) from browsing your site’s directory files directly. If they try, they’ll just see a blank page or a 403 Forbidden error.
#3: Use a Firewall and Malware Scanner
Sometimes, blocking PHP execution isn’t enough, especially if your site allows user uploads or has contact forms. That’s where security plugins step in.
Here’s what to look for:
- Real-time malware scanning (MalCare, Wordfence)
- Auto-cleanup for malicious code
- Web Application Firewall (WAF) to block suspicious traffic
With a tool like MalCare, you get daily scans, a built-in firewall, and one-click malware removal—all without slowing down your site.
#4: Keep Plugins and Themes Updated
Outdated plugins often introduce vulnerabilities that attackers can exploit. Many of these plugins interact directly with the uploads folder, especially file managers, page builders, and image optimizers.
✏️ Rule of thumb: Update your themes and plugins regularly. Delete anything you’re not using.
Final Thoughts About WP-Content Uploads
The wp-content/uploads folder is one of those WordPress components that most users forget about—until something breaks. But behind every image on your site, every file you attach to a post, and every downloadable PDF lives this quietly essential directory.
We’ve covered a lot in this guide. You’ve learned:
- What the wp-content/uploads folder is and how it fits into your WordPress site’s structure.
- Multiple ways to access it—from plugins to FTP.
- How to upload files safely using WordPress, plugins, or file managers.
- How to secure the folder against threats like malicious PHP files.
If you’ve made it this far, you now have the confidence and tools to take full control of this folder—whether you’re cleaning up, backing up, or beefing up security. Quick Final Tip: Make regular backups, use trusted file manager tools like Advanced File Manager, and keep your security plugins active and updated. Small steps now can prevent major headaches later.