By default, WordPress doesn’t offer native file management beyond media uploads. If you want to move, edit, or even browse directories beyond the standard Media Library, you usually have to rely on tools like FileZilla, cPanel, or your web host’s file manager. Most of which are slow and not beginner-friendly.
That’s where a dedicated WordPress file manager plugin steps in. It puts full control over your files directly inside your WordPress dashboard. No technical skills required. No bouncing between external tools. Just drag, drop, rename, upload, and edit without touching FTP or asking your developer for help.
In this detailed guide, you’ll learn how to set up and use a file manager inside your WordPress site, using the popular Advanced File Manager plugin. From installation to frontend access, role-based permissions, cloud integration, and more.
Let’s get started!
Why Do You Need a File Manager in WordPress?
Working with website files usually means switching between your hosting panel and an FTP client or using third-party tools. That’s fine for developers, but not for business owners, marketers, or site admins?
Moreover, FTP access isn’t always available, and cPanel can be intimidating. Plus, it’s not efficient to constantly jump between tools just to upload a PDF or access WordPress root directory files.
With a file manager plugin like Advanced File Manager, you can:
- Upload, edit, and organize files directly from the dashboard.
- Control who can access what, with detailed permission settings.
- Avoid unnecessary plugins for basic file tasks like renaming, previewing, or archiving.
- Enable frontend file management for clients or members.
More than 200,000 site owners are already using Advanced File Manager daily. It’s trusted by bloggers, agencies, developers, schools, and even large businesses.
Lastly, setting it up takes just a few minutes.
Benefits of Using Advanced File Manager Plugin
Before jumping into setup, let’s break down what makes Advanced File Manager such a solid choice.
- No More FTP or cPanel Hassles: Access and manage files from inside WordPress. No more switching tabs or sharing FTP credentials.
- Frontend File Access: Allow logged-in users—or even guests—to upload or manage files via the frontend. Perfect for membership sites, clients, or internal teams.
- Complete File Operations Suite: Copy, move, rename, delete, zip, and unzip files straight from your dashboard.
- Private Document Libraries: Create secure folders for clients, students, or employees. Limit access by role or user and protect documents from prying eyes.
- Customizable UI: Pick from multiple themes (like Windows 10 or Bootstrap), switch between grid or list views, and use keyboard shortcuts for quick navigation.
- Instant Previews: Preview PDFs, images, audio, and video files right inside the manager.
- Cloud Storage Integrations: Connect your favorite cloud storage app (e.g., Dropbox, Google Drive, or OneDrive (coming soon) for hybrid file management across local and cloud storage.
Whether you’re a beginner or an advanced user, the plugin is built to adapt to your workflow.
Prerequisites Before You Begin
To set up Advanced File Manager on your WordPress site, you’ll need a few basic things ready:
- A WordPress Website – WordPress website running the latest version of WordPress core and PHP.
- Administrator Access – You’ll need admin rights to install and configure the plugin.
- File Upload Permissions – Most WordPress installs allow this by default, but double-check your hosting environment to avoid issues.
- A License Key [Optional] – A license key for the Pro version if you want access to premium features like frontend file access, private folders, and cloud integrations.
Step-by-Step Process to Configure File Manager in WordPress
Once you’ve got all the above requirements in place, you’re ready to jump in.
Step #1: Install and Activate Advanced File Manager Plugin
- Log in to your WordPress dashboard.
- Go to Plugins → Add New.
- Search for “Advanced File Manager” in the plugin search bar.
- Click Install Now, then click Activate.

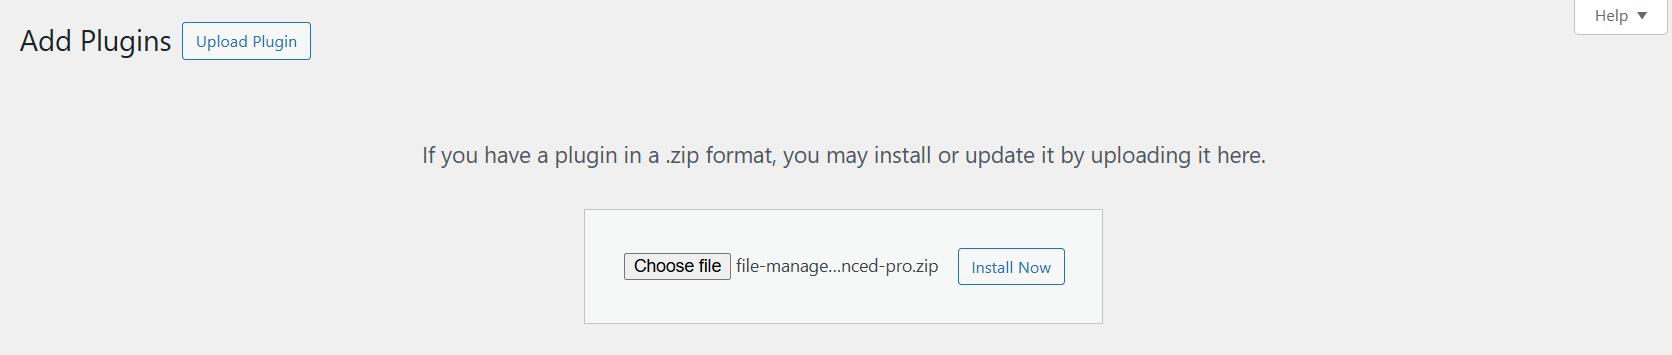
If you’ve purchased the Pro version, upload the plugin ZIP file by clicking Upload Plugin, selecting the file, and activating it once installed.
🎉 Fun Fact: According to WordPress.org, the Advanced File Manager plugin has over 200,000 active installations and maintains a 4.8-star average rating. That’s a strong indicator of reliability and performance.
Step #2: Access the File Manager in Your Dashboard
Once activated, you’ll find a new menu item in your WordPress sidebar called ‘File Manager.’
Click on it to get inside the newly installed plugin.

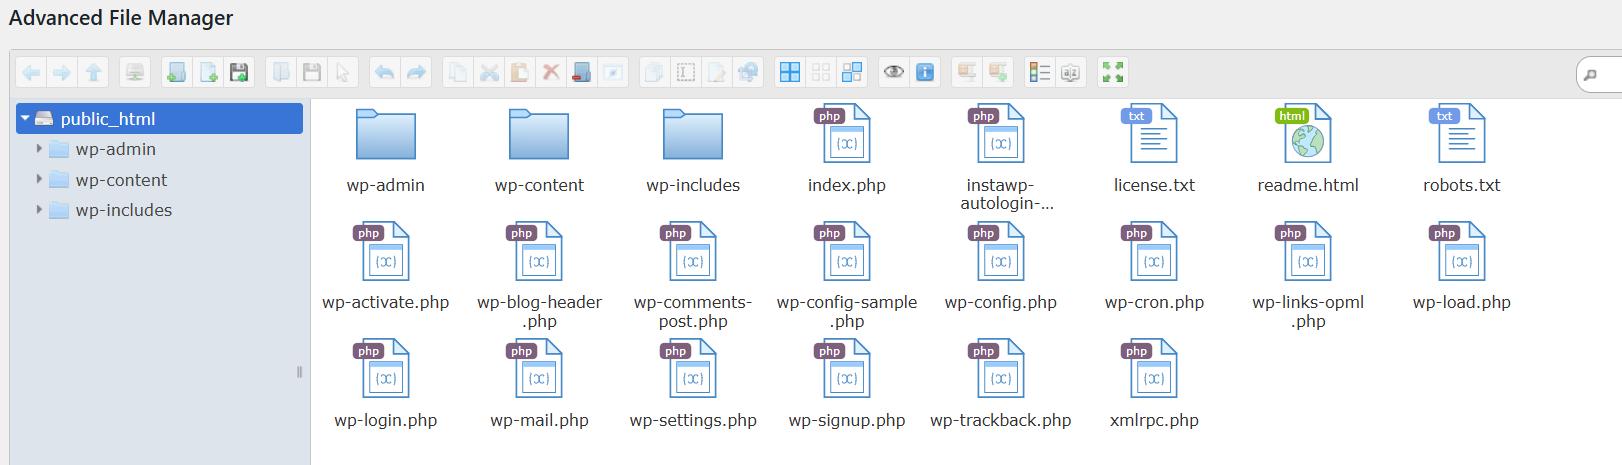
The default interface shows your site’s root directory with a simple folder structure on the left and files on the right. You’ll also see a rich toolbar for file operations.
At this point, you can already:
- Browse your site files
- Upload or download items
- Rename and move files
- Create folders
- Preview media files
No FTP. No cPanel. No headaches.
Step #3: Configure Role-Based File Access Permissions
If you’re running a multi-user site, it’s important to control who can access what.
Here’s how to configure it:
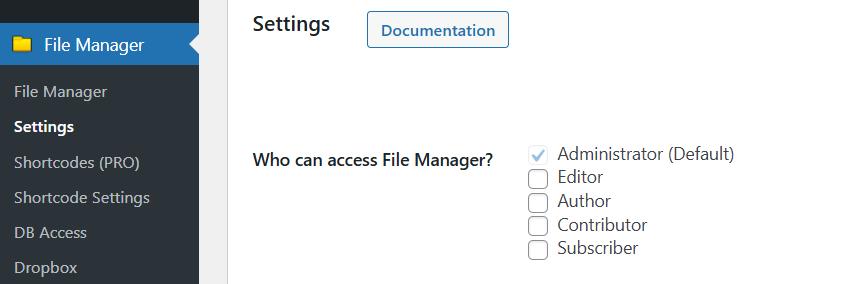
- Go to File Manager → Settings.
- Check the boxes next to ‘Who can access File Manager?’
- Assign permissions based on WordPress roles (admin, editor, contributor, etc.).
Pro Tip: With the Advanced File Manager Pro version, you can use shortcodes to allow or restrict actions like upload, delete, or view for each role. This is perfect for agencies managing client websites or schools handling student uploads.
Make Folders Private for Users (via Shortcodes)
Here’s how you can do what we just discussed:
- Create folders that only specific users can access.
- Set up a “My Files” system for members or employees.
- Display folders based on login status.
This opens up many use cases. It can be used for HR document management, client portals, learning management systems, etc.
Step #4: Customize the File Manager Interface
Advanced File Manager looks and feels intuitive. But a personalized workspace can seriously improve productivity if you’re managing files every day.
Here’s how to tailor the experience to match your style:
Switch Between Views
You can select between the Grid/Icon and List view buttons in the toolbar to change the display layout.
- Grid/Icon View gives you thumbnail previews (great for images and media).
- List View displays more details like size, date, and file type (ideal for managing lots of documents).

Choose a Theme
Head over to File Manager → Settings → Theme and pick from multiple built-in themes like:
- Windows 10-style interface
- Bootstrap-based layout
- Minimalist dark/light/grey themes

This small change can make your file manager feel more familiar and user-friendly.
Step #5: Create and Display Document Libraries (Pro Feature)
You can unlock a powerful feature called Frontend File Management using the Pro version of Advanced File Manager.
This feature allows logged-in and non-logged-in users to upload, manage, and access documents directly from the frontend of your WordPress site without accessing the dashboard.
It’s an ideal solution for:
- Client upload portals.
- Student assignment submissions.
- HR document access.
- Vendor document exchange.
Here’s How to Set It Up:
To set up a document library with limited permissions using Advanced File Manager, follow these steps:
- Open the Shortcode Builder from the WordPress dashboard by clicking File Manager → Shortcodes → Create Shortcode.

- Enter a Title in the Shortcode Title field (e.g., “Public/Private Library”).
- Choose the Shortcode Type:
- Select Logged In Users if you want only registered users to access it.
- Choose Non-Logged-In Users to allow public access.

- If you choose Logged In Users, check the user roles that can access the file manager, such as Administrator or Subscriber.

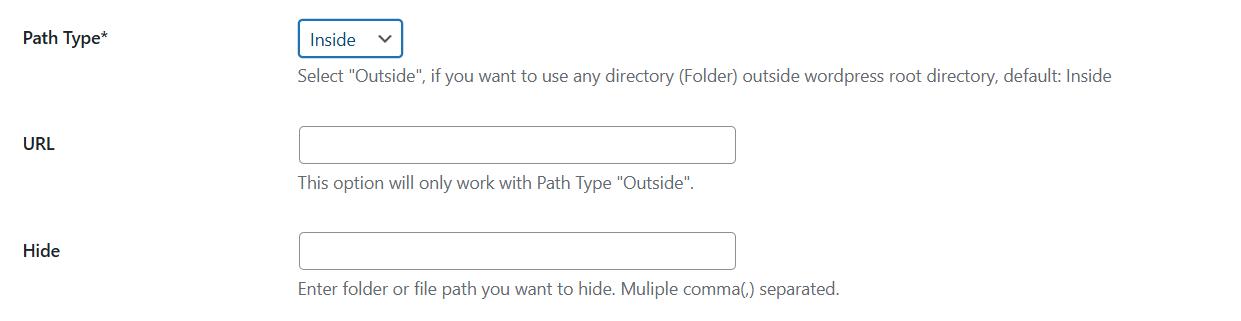
- Set the Path to the folder you want users to view (e.g., wp-content/uploads/library).

- Set Path Type to Inside to keep the view within WordPress directories.
- Leave URL blank unless using an external directory with Path Type: Outside.
- In Hide, list any folders or files you want hidden (e.g., plugins, wp-admin).
- Under Operations, uncheck all options except:
- Download (to allow file downloads)
- Open Directory (Folder), Back, Home, Up, Search (for basic navigation)
- Leave Upload, Edit, Delete, and other modification options unchecked to prevent unauthorized changes.

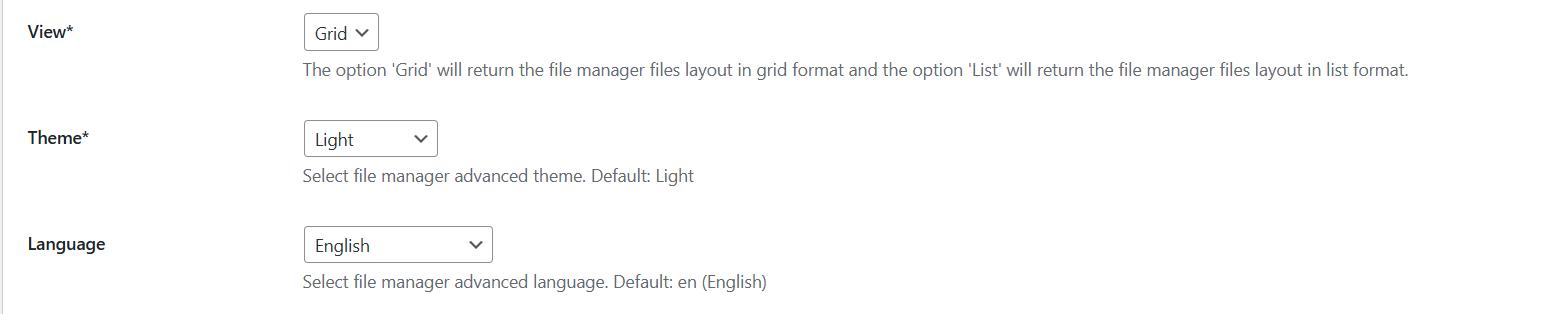
- Choose your preferred View (Grid or List), Theme, and Language.
- Set Hide Path to Yes to prevent users from seeing real file paths.

- Set Read and Write to True, but disable editing via the Operations settings.

- Click Save Changes.

- Copy the generated shortcode and paste it into any page or post.
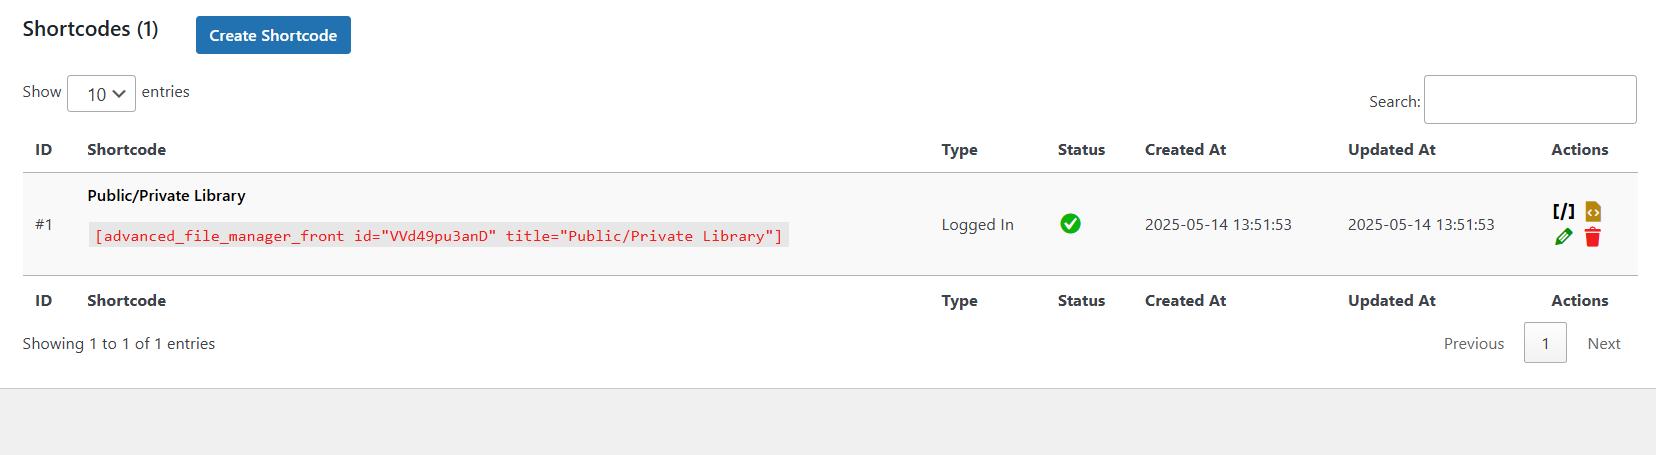
This will display a read-only document library with secure access based on your chosen user type.
Step #6: Connect to Cloud Storage Apps (Pro Feature)
If your team or business stores documents in cloud platforms like Dropbox, Google Drive, or OneDrive, you don’t have to juggle between tools.
Advanced File Manager Pro supports integration with both services.
Why Integrate?
- Access your cloud storage files right from the WordPress dashboard
- Upload and sync files directly.
- Save server space by offloading storage to the cloud
NOTE: At the time of writing, Advanced File Manager only supports Dropbox. Google Drive and OneDrive are coming soon.
To integrate Dropbox with the Advanced File Manager, follow the quick steps below:
Here’s a very short step-by-step guide to connect Dropbox with Advanced File Manager Pro:
- Enable Dropbox Integration: Go to Advanced File Manager → Dropbox, enable the checkbox, and set a custom alias.

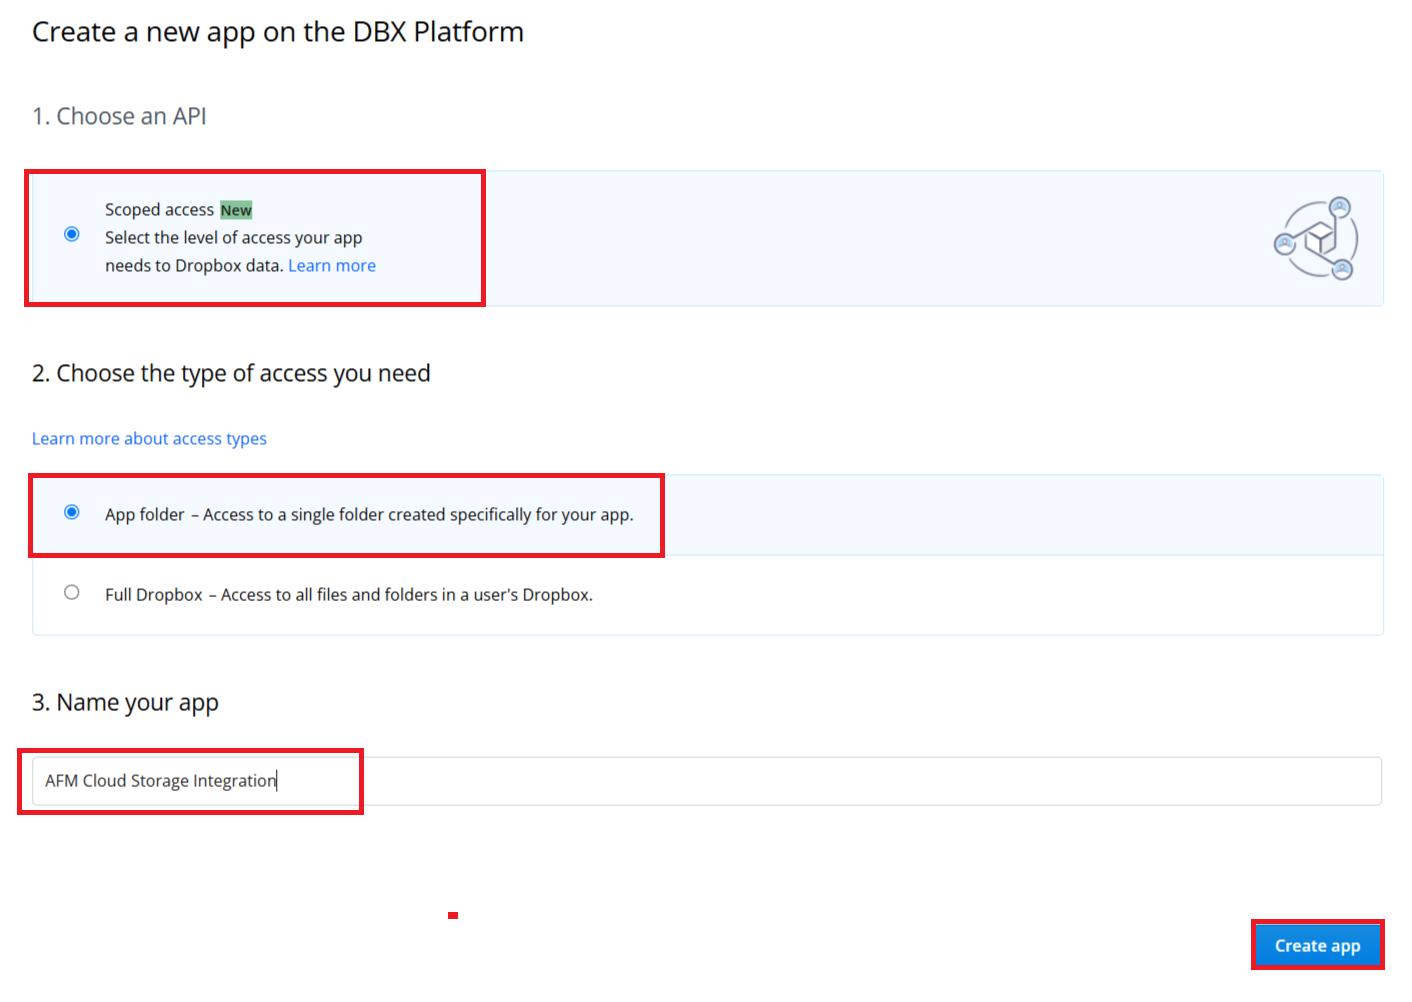
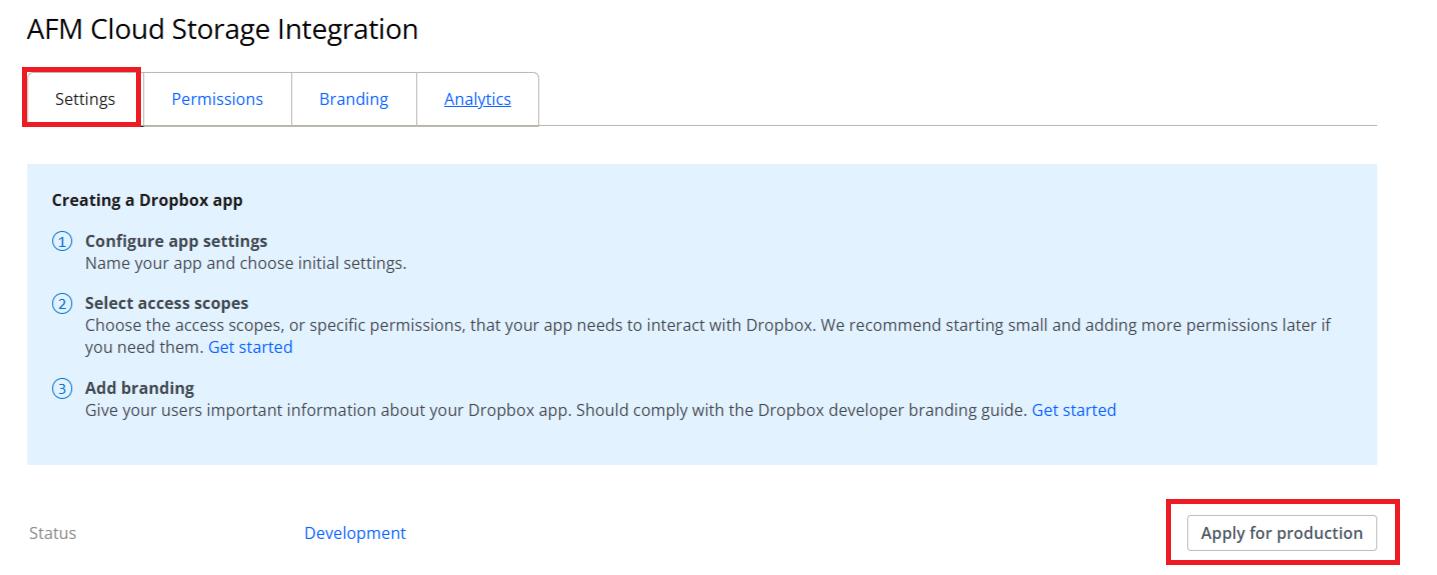
- Create a Dropbox App: Log in to the Dropbox App Console, click Create App, choose Scoped Access, pick access level, name your app, and create it.
- Configure App Settings: Copy the Redirect URL from the plugin, paste it into the OAuth 2 Redirect URIs field in Dropbox.

- Next, set the required Permissions and branding.

- Apply for Production: Submit the Request Production Status form in Dropbox to activate the app.
- Finalize Connection: Paste your App Key and App Secret into the plugin’s Dropbox settings, save changes, and click Connect Dropbox.

Done! Your Dropbox is now linked to WordPress.

Now, you’ll be able to manage cloud-stored files as if they were local. Rename, move, preview, and even share links.
For a more detailed explanation, check out the Dropbox announcement blog.
Troubleshooting Common Setup Issues
Even with the best plugins, things don’t always go smoothly. Here are some common issues users face and how to fix them:
- File Uploads Not Working?
Check your PHP upload limits under php.ini. Many hosts set low defaults (like 2MB). Raise these values:
upload_max_filesize = 64M
post_max_size = 64M
Also, make sure file permissions on your /wp-content/uploads directory are correctly set (usually 755 or 775).
- Users Can’t See the File Manager?
Make sure they have the correct WordPress role and that that role has been granted access to the plugin’s Access Control settings.
- Frontend File Manager Not Showing?
Check for shortcode typos or plugin conflicts. Try disabling other plugins temporarily to rule out compatibility issues.
- Cloud Storage Integration Failing?
Ensure your Cloud Storage API is set up correctly and whitelist your WordPress domain.
Final Thoughts: Manage Files Smarter with Advanced File Manager
WordPress wasn’t built to be a full-blown file management system out of the box. But with Advanced File Manager, it easily becomes one.
You can:
- Upload, organize, and preview files with ease.
- Give clients or members secure frontend access.
- Connect cloud services like Drive or OneDrive.
- Customize everything—from themes to user permissions.
And you can do all of this without ever touching FTP or cPanel.
If you’re still relying on outdated tools or switching between platforms just to handle files, it’s time to upgrade your workflow.
👉 Ready to make WordPress file management effortless? Download Advanced File Manager for free or Get the Pro Version and start organizing your site like a pro today.
Frequently Asked Questions (FAQs)
Can I use Advanced File Manager without coding knowledge?
Absolutely! Advanced File Manager is built for everyone. No coding or FTP experience needed. You can upload, edit, and organize files using a drag-and-drop interface right inside your WordPress dashboard.
Is Advanced File Manager compatible with all WordPress themes?
Yes! The plugin is designed to work with most modern themes and page builders, including Elementor, Divi, Astra, and Blocksy. It also supports both the classic editor and Gutenberg.
What file types can I upload?
You can upload all standard file formats, such as:
- Documents: PDF, DOCX, XLSX
- Media: JPG, PNG, MP4, MP3
- Archives: ZIP, RAR
- Others based on your server settings
You can also allow or restrict specific file types under plugin settings.
Can I limit file access for specific users or roles?
Yes, you can. Advanced File Manager includes robust role-based and individual user access controls. You can restrict access to certain folders or allow only specific users to upload or view files.
Does it support large file uploads?
Yes, especially with Pro. It includes chunked upload support, which lets you upload large files in smaller pieces. Just make sure your server’s PHP limits are configured to allow bigger uploads.
Can I manage files from the frontend?
Yes! The Pro version allows logged-in users—and even public visitors (if you want)—to manage files from the frontend using a shortcode or Gutenberg block, which makes it an ideal choice for client portals, student dashboards, and more.
Is cloud storage integration available?
Yes! Advanced File Manager Pro supports Dropbox integration, and soon, Google Drive and OneDrive integration will be available. You can manage cloud files directly from your WordPress dashboard and even sync or display folders.
Is Advanced File Manager safe?
Very much so. Features like path privacy, file sanitization, role-based access, and private folders help you stay protected. Plus, no sensitive paths are ever exposed on the frontend.